02 July 2024, Danny Koppenhagen
Supercharge Your Angular PWA with Push Notifications: From Setup to Debugging
Supercharge Your Angular PWA with Push Notifications: From Setup to Debugging
In modern web applications, push notifications have become an essential feature for engaging users. Service workers are crucial in enabling this functionality by running scripts in the background, independent of a web page. This guide will walk you through setting up a service worker with push notifications in Angular, including testing, verifying, debugging, and avoiding common pitfalls.
Registering a service worker and setting up push notifications can be very cumbersome.
You need to create and register a service worker script in your JavaScript code using the navigator.serviceWorker.register method.
This script handles events by listening for the push event and displaying notifications using the self.registration.showNotification method.
Additionally, you need to manually handle requesting user permission for push notifications, typically using the Notification.requestPermission method,
and manage push subscriptions with the Push API,
including handling VAPID keys for authorization.
This requires quite a lot of boilerplate code and direct management of the service worker lifecycle and push events.
And last but not least:
You probably need to find a way to communicate/connect the service worker with your Angular app, for example, to handle a direct jump-in from a push notification and passing over data.
Luckily, the Angular Framework comes with built-in support for all this. But let’s start step-by-step by setting up a very simple Angular demo app.
High Level Overview
Sending a notification to an application sounds easy but…
-
We need a secure client/server communication to deliver publish messages and subscribe to notifications.
-
The server needs to find the specific browser to deliver the notifications reliably.
-
We must integrate with the native notifications of our operating system.
-
To receive messages even when a browser or tab is closed, we need a background service (Service Worker) listening to incoming notifications.
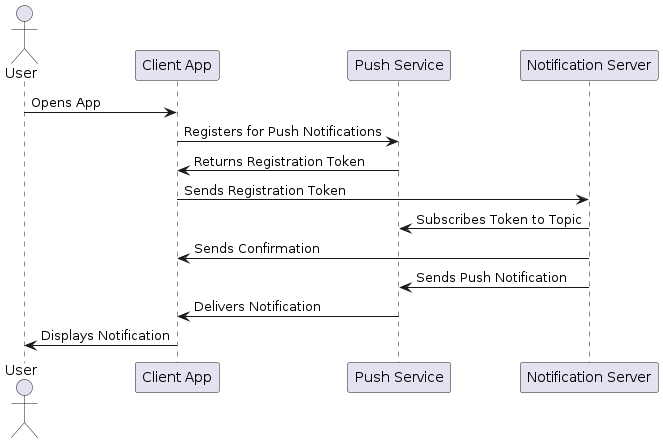
The following sequence diagram gives you a high-level overview of the general flow we will establish in the next sections.
Set up a simple demo app
We are creating a blank Angular app by using the Angular CLI.
After creation, we can directly add @angular/pwa by using its provided Angular Schematic.
It will turn our app into a Progressive Web App (PWA) and add all necessary features including a service worker.
Let’s name our app "Push Parrot" since we use it to demonstrate push notifications and it should repeat every input like a parrot.
ng new push-parrot
cd push-parrot
ng add @angular/pwa
Now we have a working web application that can be installed as a Progressive Web App.
Its prepared with a Web app manifest,
and it registers a service worker configured with cached resources.
The created file ngsw-config.json is used by Angular for this basic service worker configuration.
The service worker Angular registers for us is also linked to some services we can consume now in our app to check for new versions or handle push notifications (which we will do in a sec).
Alright, lets start the app:
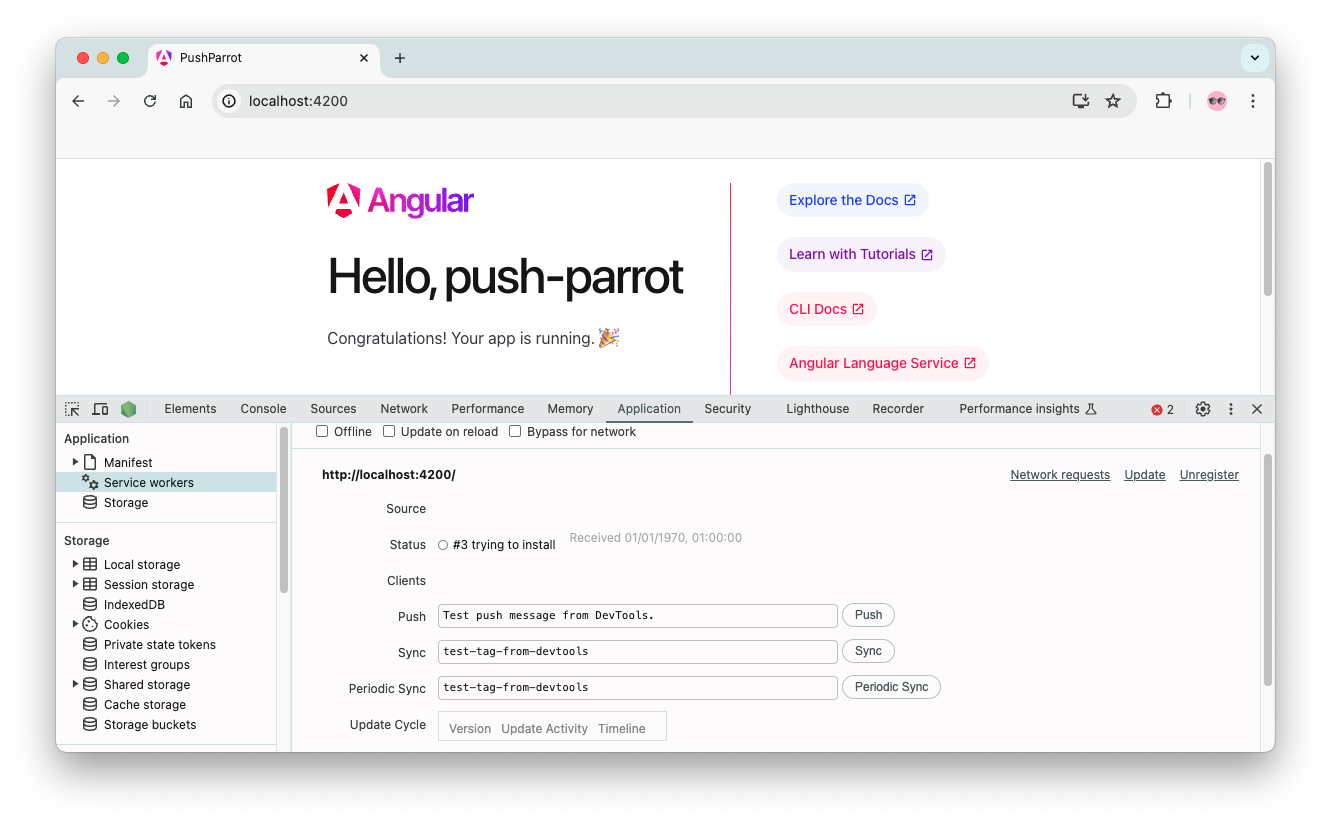
npm startAs we can see, we are able to install the app (Icon in Browser URL bar). Checking out the Google Chrome Developer Tools, we can see in the "Application" tab under "Service Worker": No service worker.

Wait… No service worker? Shouldn’t we see a service worker here?
Yes, you are right, but let’s have a look into our app.config.ts file.
Here we can see that the enabled option is only activated in production mode by default.
So in conclusion, the service worker will not be registered in dev mode.
We can change this line to be always true for our demo.
// ...
export const appConfig: ApplicationConfig = {
providers: [
  // ...
  provideServiceWorker('ngsw-worker.js', {
-   enabled: !isDevMode(),
+   enabled: true,
    registrationStrategy: 'registerWhenStable:30000'
  })]
};
A second thing we have to do, to make service workers work locally in dev mode is that we need to tell Angular about the service worker config file. Therefore, we copy the line for the config file from the production config to the development config:
{
  // ...
  "projects": {
    "push-parrot": {
      // ...
      "architect": {
        "build": {
          // ...
          "configurations": {
            "production": {
              // ...
              "serviceWorker": "ngsw-config.json"
            },
            "development": {
              // ...
+             "serviceWorker": "ngsw-config.json"
            }
          },
          // ...
        },
        //...
      }
    }
  }
}
Alright, if we have another look now, we can see the service worker is successfully registered.
Test notifications without a backend
Okay, let’s make our parrot talk. We want to simply output all received push messages in the UI.
Create a service
We start by creating a simple service which handles all the notification stuff for us.
ng g s web-notificationThe service should have the responsibility to tell us whether push messaging is activated or not.
Also, it should inform us about the latest message received.
We are injecting the SwPush instance which is an abstraction for the interaction with the underlying service worker and uses the ngsw-config.json.
We want to consume the messages as a signal.
Therefore, we can use the toSignal function from the rxjs-interop package provided by Angular.
This will update the signal messages every time the Observable swPush.messages emits a new value.
The last thing we need is a simple getter isEnabled which basically passes through the information if service is enabled and supported by the browser from the private #swPush instance.
import { inject, Injectable } from "@angular/core";
import { SwPush } from "@angular/service-worker";
import { toSignal } from "@angular/core/rxjs-interop";

@Injectable({ providedIn: 'root' })
export class WebNotificationService {
  #swPush = inject(SwPush)

  messages = toSignal(this.#swPush.messages)

  get isEnabled() {
    return this.#swPush.isEnabled;
  }
}
Use the service
Great, let’s consume our service in the AppComponent.
We want to create a Signal permission that represents the current state of Notifications (can be "default", "denied" or "granted").
Later on, we are updating the signal, but one step at a time.
The last thing we need here is the JsonPipe.
We need to include it, to display JSON data we received as a notification directly in the UI.
import { Component, inject, signal } from "@angular/core";
import { WebNotificationService } from "./web-notification.service";
import { JsonPipe } from "@angular/common";

@Component({
  /* ... */
  imports: [JsonPipe]
})
export class AppComponent {
  permission = signal<NotificationPermission>("default");

  notificationService = inject(WebNotificationService)

  constructor() {
    if (this.notificationService.isEnabled) {
      this.permission.set(Notification.permission)
    }
  }
}
Now we need to output our results in the template. First, we get rid of all the current demo code created by the Angular CLI. Next, we add a simple template to print the current permission state and show the received messages. You can add some styles to make it look good, but it’s out-of-scope of this article. At the end of this article, you will find a link to the demo code with all the styles I added.
<h1>Push Parrot</h1>

<div type="button" (click)="subscribe()"
  [class.green]="permission() === 'granted'"
  [class.red]="permission() === 'denied'"
>Notifications: ({{ permission() }})</div>

@if(notificationService.messages(); as messages) {
  <pre>{{ messages | json }}</pre>
}
So far so good. But how can we test it if we don’t have a backend connected?
Test with Chrome Developer Tools
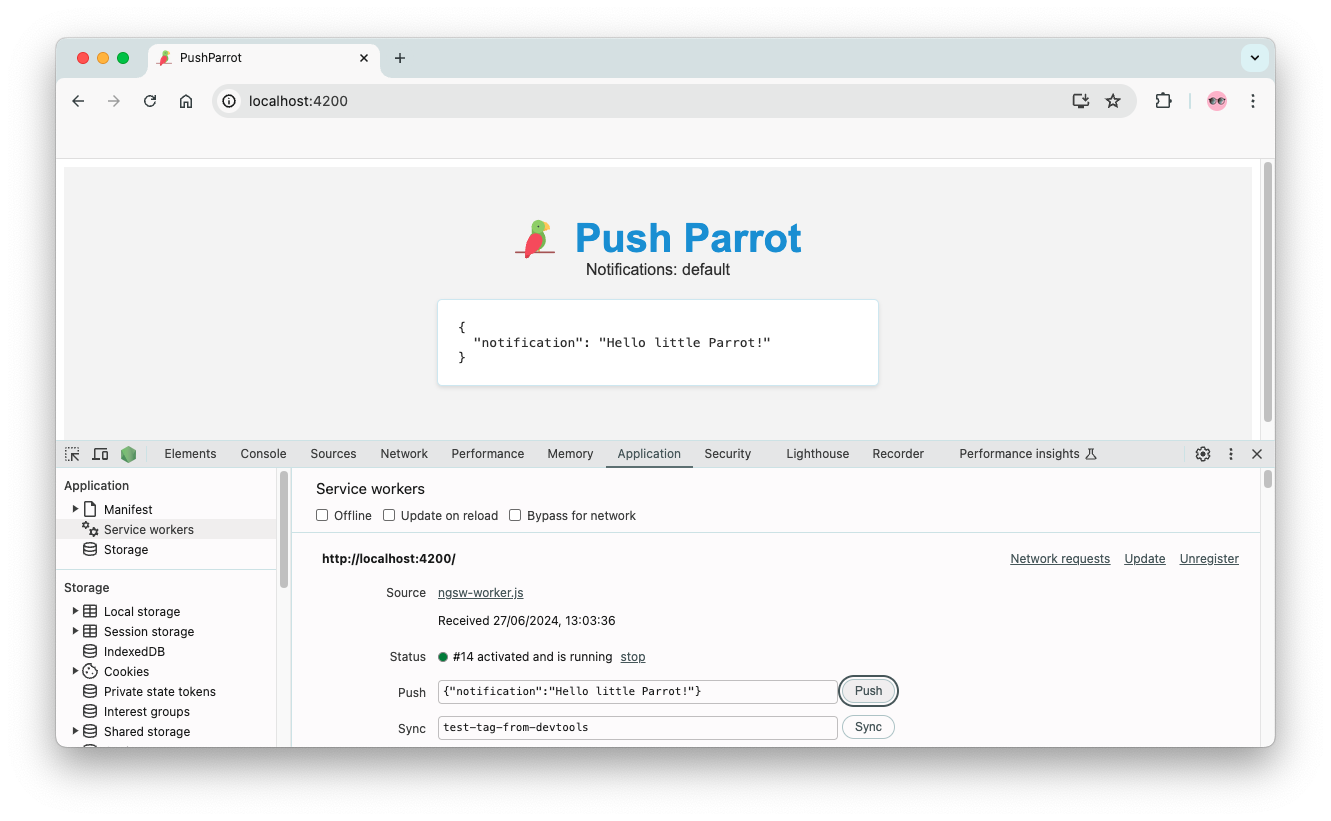
Luckily the Chrome Developer Tools are our friend. We can directly send messages to our connected service worker using the "Push" button. Let’s try it out and see what happens.
Enter the following JSON input here and press "Push":
{"notification":"Hello little Parrot!"}Awesome, now we should see the message in our UI.
But wait? This wasn’t a push message which should appear as a native message in our operating system right? We simply display the data of the last received message here.
And this totally makes sense since we haven’t granted any permissions that allow us to be notified in case of new messages.
The permission signal is still in the "default" state. which means permissions have neither being granted nor denied.
Start recording notifications and push messaging
Before we start the implementation of this step, let’s use our developer tools to investigate a few more details. In the "Application" tab of the DevTools, we have a section for background services with the label "Notifications". Let’s have a look at it. This neat little feature allows us to record any received push messages for further inspection. We can simply start the recording for notifications received from now on. The cool thing is: It even records the notifications of delivered messages when the current tab is in background or even when the browser is closed but the service worker still receives messages. With this you can inspect messages you expect to have received, when your application is closed.
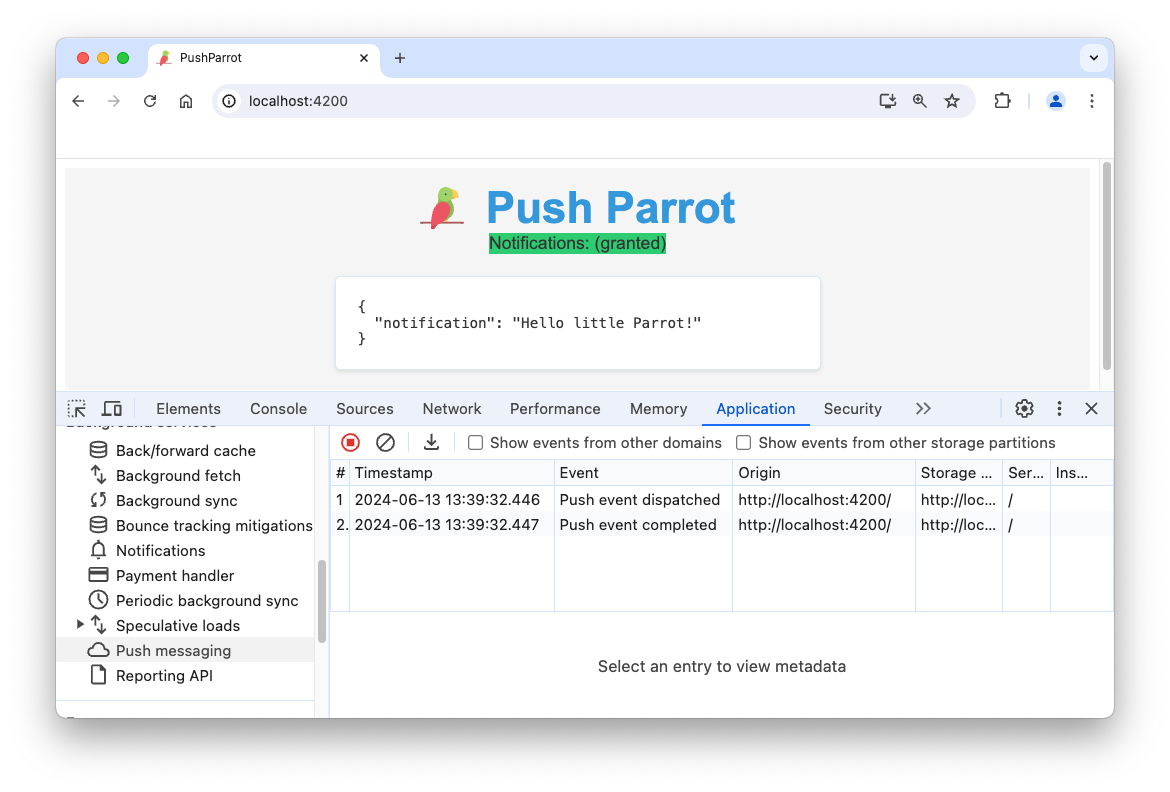
The counterpart to the received notifications is the section "Push Messaging". This works quite similar and we can start recording from now on. In comparison to the "Notifications" view, here we can see all push messaging activity even if users haven’t granted permission for notification. This helps us to inspect scenarios where we received messages in general but did not get notified.
Let’s try it out and start recording both: "Notifications" and "Push Messaging". We switch to the "Service Workers" section again and send our JSON input a second time. Now we should not see any new entry in the section for "Notifications" because we haven’t granted it permission. But checking the section "Push Messaging" gives us the insight, that the messaging works in general and that an event was dispatched and completed.
Create a simple Messaging Server
What we need to actually deliver real push messages is a little server. The server needs to register each subscriber and is responsible for sending messages to them.
In the following example I am using a simple nodejs server written in JavaScript. I put this demo server right next to my angular app.
Basic Server
First things first, we need to install some dependencies for our server:
npm i express cors body-parser web-pushLet’s start by creating a new file src/server/index.js with a simple express.js skeleton.
We need to enable Cross-Origin Resource Sharing (CORS) since we want to get access from another origin (http://localhost:4200).
import express from "express";
import bodyParser from "body-parser";
import cors from "cors";

const app = express();
const port = 3000;

app.use(cors());
app.use(bodyParser.json());

app.listen(port, () => {
  console.log(`Server started at http://localhost:${port}`);
});
VAPID Keys
To securely send notifications to a browser, we use VAPID (Voluntary Application Server Identification for Web Push) keys. VAPID keys are a pair of public and private keys used to identify the server and ensure the authenticity of notifications. We use the web-push library to generates these keys.
The public key can be used by an application when setting up notifications. It will be checked by the server to ensure our connected frontends are allowed to make use of the notifications. But let’s start by creating a simple endpoint that sends the public key to a client when requested.
/* ... */
import webPush from "web-push";

/* ... */

const vapidKeys = webPush.generateVAPIDKeys();

app.get('/vapidPublicKey', (req, res) => {
  res.send(vapidKeys.publicKey);
});

/* ... */
Now we can start the server and check if the endpoint sends us a public key once started.
> node src/server/index.mjs
Server started at http://localhost:3000
> curl http://localhost:3000/vapidPublicKey
BALZVv0uBWpP9ttSJFCid0VB7x99e4oLkbsamrit5CzKvZQEwyQ_YsK95YEo418OBhfQqcS8XsYS6KSpuLCAdNA%Subscribe to messages
Clients can now use the public key, to create subscriptions in the browser. To be able to send messages to the subscribers, the server needs to know about these subscriptions. Therefore, we create another endpoint, that receives the subscription data and stores it internally. With this, the backend now has the information about connected clients / push subscriptions and we are able to send data to this subscribers.
/* ... */

const subscriptions = [];

/* ... */

app.post('/notifications/subscribe', (req, res) => {
  const subscription = req.body;
  subscriptions.push(subscription);
  res.status(201).json({});
});

/* ... */
Send messages
First we must configure web-push with the contact email, public key and private key. This function is crucial for configuring the push notifications. It ensures that notifications are trusted and can be decrypted by the user’s browser.
The last step is to handle incoming messages for subscribers.
We iterate over all subscribers and call sendNotification.
We send the title and description we received as the POST body as JSON.
Last but not least, we iterate over the returning promises using Promise.all() and send a response to the requester.
/* ... */

const subscriptions = [];
webPush.setVapidDetails(
  'mailto:mail@example.org',
  vapidKeys.publicKey,
  vapidKeys.privateKey
);

/* ... */

app.post('/notifications/send', (req, res) => {
  const promises = subscriptions.map(sub =>
    webPush.sendNotification(sub, JSON.stringify({
      notification: {
        title: req.body.title,
        body: req.body.description
      }
    }))
  );

  Promise.all(promises)
    .then(() => res.status(200).json({ message: 'Notification sent successfully.' }))
    .catch(err => {
      console.error('Error sending notification, reason: ', err);
      res.sendStatus(500);
    });
});

/* ... */
Great, our server code should be good enough for our purpose now. Let’s continue by connecting a frontend.
Send Notifications via a backend
As always we start by adjusting our service.
Lets add three new methods that will fetch / post data from / to our backend.
The private methods #vapidPublicKey and #registerOnServer should be used in the next step for setting up the push subscription.
The method #vapidPublicKey will simply retrieve the public key from our backend whereas #registerOnServer posts the subscription params to it.
The third method sendMessage should be public since we want to use it in our component.
This service should receive a title and a description and sends this data as JSON body to the server’s responsible endpoint.
/* ... */
import { HttpClient } from "@angular/common/http";

@Injectable({ providedIn: 'root' })
export class WebNotificationService {
  /* ... */
  #http = inject(HttpClient)
  #baseUrl = 'http://localhost:3000'

  /* ... */

  #vapidPublicKey() {
    return this.#http.get(
      `${this.#baseUrl}/vapidPublicKey`,
      { responseType: 'text' }
    )
  }

  #registerOnServer(params: PushSubscription) {
    return this.#http.post(
      `${this.#baseUrl}/notifications/subscribe`,
      params
    );
  }

  sendMessage(title: string, description: string) {
    return this.#http.post(
      `${this.#baseUrl}/notifications/send`,
      { title, description }
    );
  }
}
Now, we introduce another public method in the service called requestSubscription.
This method should be called from the component to setup the subscription.
It will use the Observable with the public VAPID key.
We use the switchMap operator in the pipe to switch to another observable created out of a promise using the from creator function.
Within which we call the swPush instance and request to subscribe using the public key.
The next step in the pipe is to use concatMap for sending the subscription data via the private method #registerOnServer.
Last but not least, we catch any errors, log them and return an empty Observable.
/* ... */
import { catchError, concatMap, EMPTY, from, switchMap } from "rxjs";

@Injectable({ providedIn: 'root' })
export class WebNotificationService {
  /* ... */

  requestSubscription() {
    return this.#vapidPublicKey().pipe(
      switchMap(key =>
        from(this.#swPush.requestSubscription({
          serverPublicKey: key
        }))
      ),
      concatMap(sub => this.#registerOnServer(sub)),
      catchError((e) => {
        console.log(e)
        return EMPTY
      })
    )
  }
}
Now we need to adjust our component.
We want to create a small form using Angulars reactive forms.
Therefore we need to import the ReactiveFormsModule to use it in the template in the next step.
We initialize a simple form with two inputs: title and description.
Next, we create a subscribe method, that’s triggered by a button to activate push notifications and subscribe to new messages on the server.
In the subscription we set the permission signal to the current value of Notification.permission.
With this, we can see in our UI, if the current permission state is "default", "denied" or "granted".
The last method we need is the submit method to send the current form data via the service to our backend which will push the entered message to all subscribers.
We also need to subscribe to this call in order to start the HTTP call as it only sends notifications if a subscriber is registered.
/* ... */
import { FormControl, FormGroup, ReactiveFormsModule } from "@angular/forms";

@Component({
  /* ... */
  imports: [JsonPipe, ReactiveFormsModule],
})
export class AppComponent {
  notificationForm = new FormGroup({
    title: new FormControl(''),
    description: new FormControl(''),
  });

  /* ... */

  subscribe() {
    this.notificationService.requestSubscription().subscribe(() => {
      this.permission.set(Notification.permission)
    });
  }

  submit() {
    this.notificationService.sendMessage(
      this.notificationForm.value.title || '',
      this.notificationForm.value.description || ''
    ).subscribe()
  }
}
Okay, the logic is ready so far, let’s adjust the template of our component to actually implement and show the subscribe button and the formular. The first button triggers the subscription and under the hood the process of asking the user for the permissions to show notifications.
The form must be connected with the notificationForm form group.
With the combination of the button button[type="submit"] and the output handler for ngSubmit we start sending the form data to the subscribers.
<h1>Push Parrot</h1>
<button type="button" (click)="subscribe()"
[class.green]="permission() === 'granted'"
[class.red]="permission() === 'denied'"
>Notifications: ({{ permission() }})</button>
<form [formGroup]="notificationForm" (ngSubmit)="submit()">
<label for="title">Title</label>
<input id="title" placeholder="Please enter a title" type="text" formControlName="title">
<label for="description">Description</label>
<input id="description" placeholder="Please enter a description" type="text" formControlName="description">
<button type="submit">Send</button>
</form>
@if(notificationService.messages(); as messages) {
<pre>{{ messages | json }}</pre>
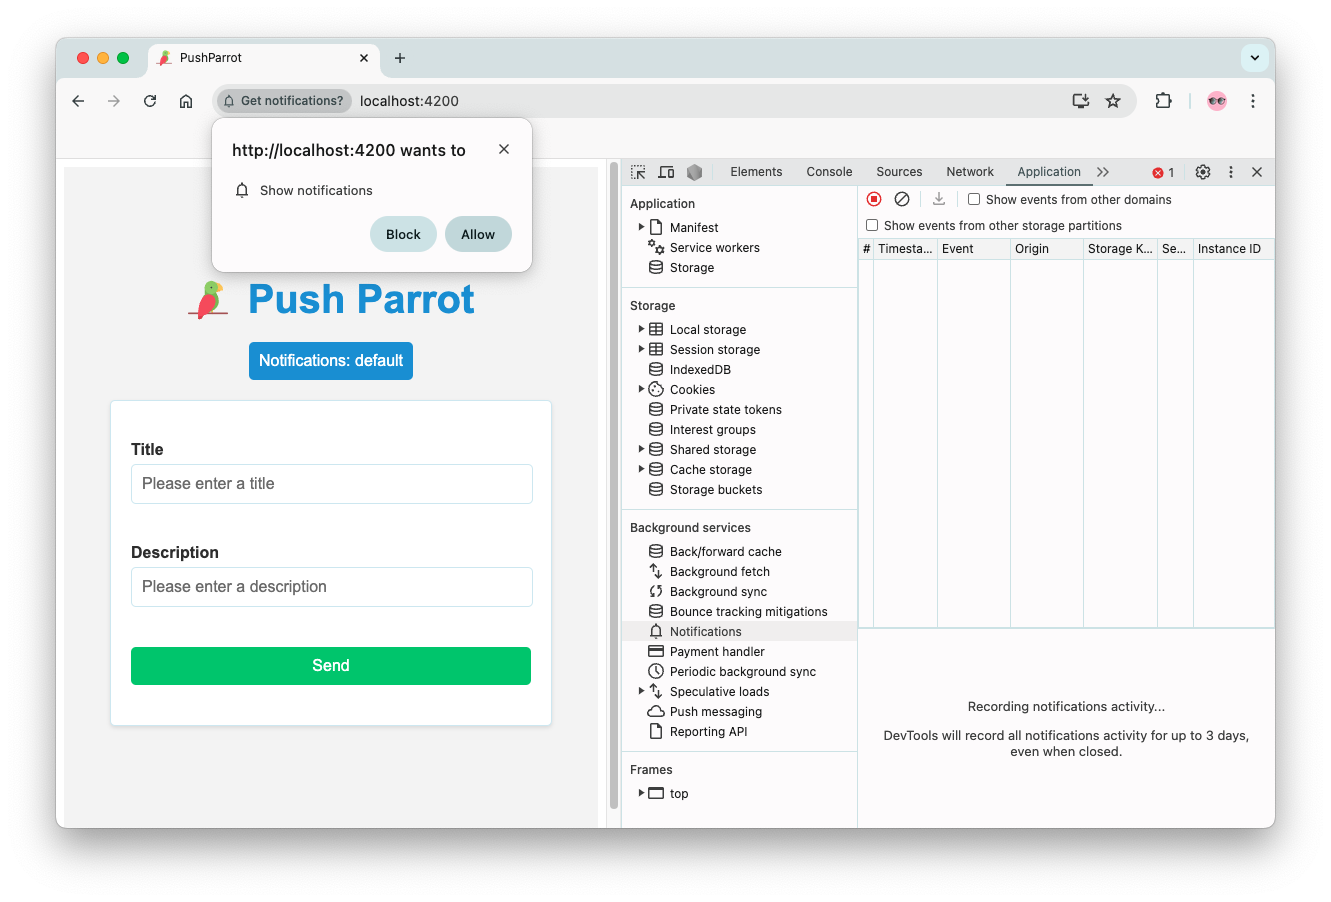
}Done. Let’s try it out! Please be aware, you need to re-activate the permissions every time the backend is restarted since a new VAPID keypair is generated. Once you press the notifications button, your browser should ask you to grant permissions.
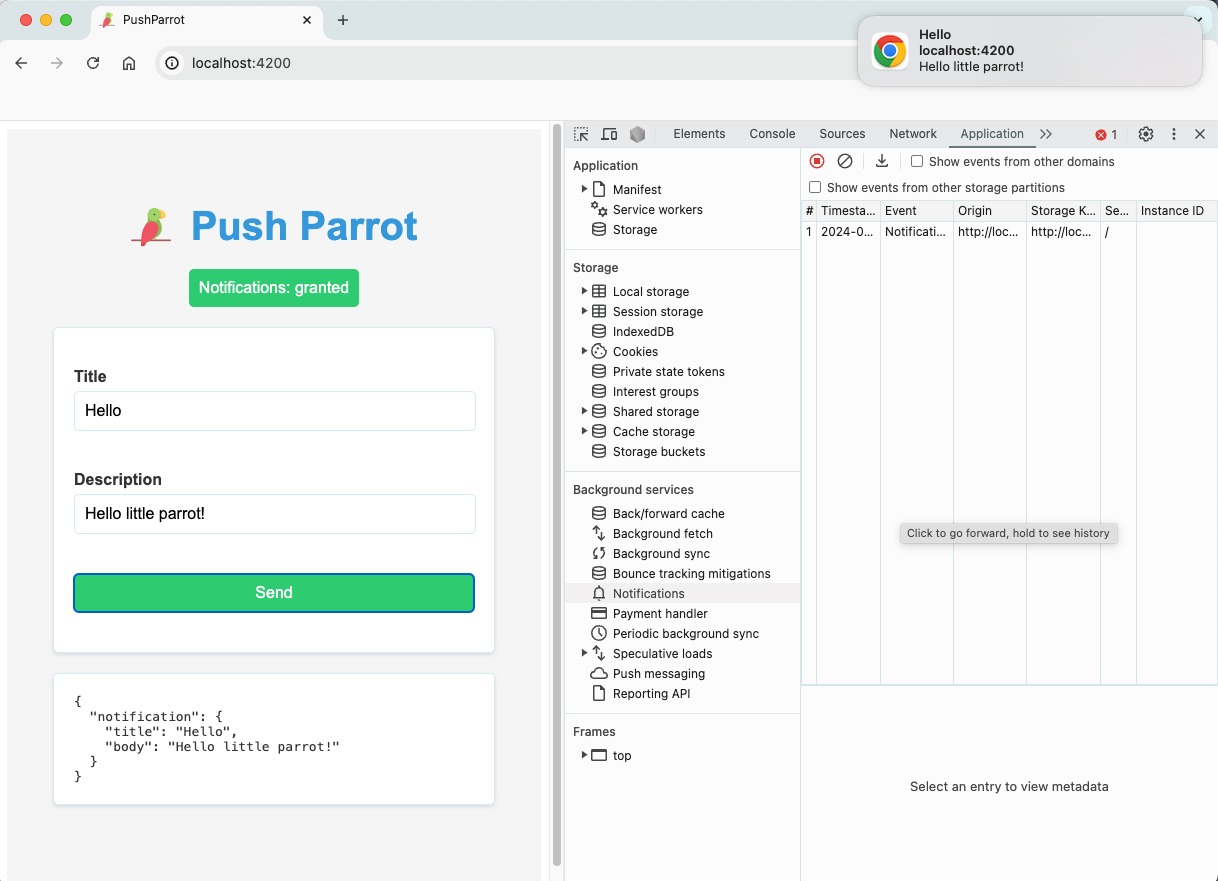
Now your local app ist registered to receive push notifications from the backend and you are registered as a subscriber for new messages. We can use our UI and the formular to send a message to the servers which is echoed by our parrot in the UI as well as a push notification sent by the backend to our subscribed frontend. Once we submit the form, we also see the message in the developer tools in the "Notifications" section. The cool thing is: this will even work if we close the tab / browser and receive messages. So it helps us to inspect potentially missed messages.
Pitfalls & Limitations
Push messages are a great way to notify users about important information. This helps us to keep users informed but on the other hand they can be very noisy and distracting if overused. So please always think twice if a message is really necessary and helpful.
Also, there are some common pitfalls / limitations where you might wonder why you haven’t received a message. So always ensure the following things when testing / debuggung such situations:
-
Is the messaging server up and running?
-
Were permissions granted in the browser?
-
Is you system in "Don-not-disturb" mode?
-
Have you checked the DevTools for the Push Messaging and Notification settings and verified that you should have received the message?
-
Does your application code filter out any messages?
-
Is your application served over HTTPS (or on localhost)? A service workers requires a secure context.
-
Clear your browser cache and unregister the service worker manually in DevTools if updates are not being reflecting.
-
Make sure to handle cases where users deny notification permissions and provide a way to request permissions again.
Next Steps
Great, you managed to setup a very simple frontend and backend for creating and a delivering push messages to all subscribers.
The setup is currently very basic and only processes some text information.
Push messages can be configured in more detail which is out-of-scope of this article but stay tuned! I will publish a followup article where we will configure messages a bit more and learn how to react to message clicks etc.
Resources
Push Notification PWA JavaScript Angular Service Worker Web Push
Feedback
Was this page helpful?
Glad to hear it! Please tell us how we can improve.
Sorry to hear that. Please tell us how we can improve.